

In last week’s post, I introduced a simple YAML pipeline that can be used within Azure DevOps to deploy your Terraform infrastructure.
Today, I’ll build on that foundation and walk through a set of practical, production-ready improvements that harden the pipeline, protect the main branch, and make Terraform changes safer and easier to review.
Here’s what you’ll learn
- Branch Policy security – prevent direct commits to main and force the use of pull requests
- Run an automatic validate and plan pipeline when a pull request is issued
- Run basic Terraform security checks automatically
Understanding how pipeline parameters get passed to Terraform
In our pipeline, we defined a few parameters for regions and environment (dev/uat/prod) which we’ll use within our Terraform code. In Terraform, we can pass inputs in a few different ways:
- During the
terraform plan/applyusing the-var "environment=prod"flag - During the
terraform plan/applyusing a.tfvarsfile with-var-file="xxx.tfvars" - Using environment variables within the OS running the pipeline
When we create parameters, we can simply push them into the Terraform plan/apply command using the -var="environment=${{ parameters.environment }}" syntax.
In Terraform, we simply have to declare a variable:
variable "environment" {
  type        = string
  description = "The environment to deploy to: dev, uat, prod"
  default     = "dev"
}
Using OIDC Federated DevOps Credentials within Terraform
When using ADO OIDC Federated service connections, we are not tied directly to a subscription. We need to specify the workload subscription ID where we will deploy our resources to. We also need to tell Terraform the connection is using OIDC to connect to Azure.
Within our Terraform code we need to create a provider block for the Azure Resource Manager provider, within it, we will pass in the workload subscription ID and tell it we are using OIDC.
provider "azurerm" {
  features {}
  use_oidc        = true
  subscription_id = var.deployment_subscription_id
}
You can either pass in the subscription directly, or create a variable which can be configured through tfvars or variable inputs when running the terraform plan / apply commands.
Git branching strategy
Even if you’re a single developer, it makes sense to set up the Git framework in a way that will protect you but also scale if new team members come on board. I’ve made the mistake before of not setting up Git in a team-friendly way, and it’s caught me out as we onboard new team members.
Here’s the approach I find has worked for me, but find the option that works for you.
Main branch
The critical focus of the main branch is that it should always remain deployable. This means we never work directly in the main branch. We require pull requests with approval steps to commit code to main.
In addition to always being deployable, I really like the idea of having Git tags that we can use as versions. I’ll show you how to automatically create tags when a commit to main is made. Tags allow us to call specific versions of our main branch, so we can introduce version control into our modules and infrastructure—it helps when we need to introduce breaking changes.
Feature branches
Whenever we work on Terraform code, we create a feature branch for the particular feature/bug/update we’re making. When we commit code to the feature branch and push it to Azure DevOps, we want to automatically run a terraform validate and terraform plan. If the plan is successful, we can then create a pull request to update the main branch, which we can then deploy from.
What runs where?
This simple table illustrates what we run against each branch and action:
| Branch / Action | Terraform Action |
|---|---|
| Feature Branch | Terraform validate / plan |
| Pull Request | Plan (commented back to Pull Request) |
| Main | Apply (only after approval) |
What is the pull request?
When we’re working on feature branches and we’re ready to deploy, we want to create a pull request. A pull request initiates the process where we can have approvers validate the code and Terraform plan (automatically submitted with the pull request) before the code gets committed to the main branch.
Why it matters
- Reviewers and approvers see exactly what is changing, why it’s changing, and what the impact will be
- Prevents accidental deployments—no “I didn’t realise that would happen” moments
- No more guessing what has changed and looking through multiple commits and code diffs
- Makes infrastructure changes auditable and repeatable
How it fits into our existing deployment model
We already have a working Terraform plan stage within our pipeline, and we separated out the apply stage and added an approval stage. What we want to add is a pipeline that’s triggered when a pull request is submitted. The pull request pipeline would run:
terraform validateterraform plan- Publish the plan output
Our code review team will then review the pull request, validate the Terraform plan, and if approved, the code gets committed to main with an automatic version tag created.
Let’s break this down with a working example.
The pull request pipeline
We need to create a pipeline that gets triggered when a pull request is submitted within Azure DevOps. The pipeline will run the terraform validate and plan commands, and the output will be automatically appended to the pull request, allowing reviewers to visually see the impact of the pull request prior to approval.
One caveat here is that the pull request pipeline can’t accept parameters—it needs to run automatically. Our original pipeline I showed in the previous post accepts parameters for the location and environment. For the purposes of the pull request, we need to default to one environment and one location.
Remember, our code should be reusable across multiple environments and regions, so when doing a plan, it should reflect the correct output. With this in mind, it makes sense to default the pull request pipeline to use the DEV environment and a primary region.
trigger: none

pr:
  branches:
    include:
      - main

pool:
  vmImage: "ubuntu-latest"

variables:
  # Fixed, deterministic inputs for PRs
  environment: dev
  location: centralus

  # Replace with your actual resource group, storage account and container name
  management-subscription-id: "xxxx"
  TFSTATE_RESOURCE_GROUP: "xxx"
  TFSTATE_STORAGE_ACCOUNT: "xxx"
  TFSTATE_CONTAINER_NAME: "xxx"

stages:
  - stage: ValidateAndPlan
    displayName: "Terraform PR Validate and Plan"
    jobs:
      - job: TerraformValidateAndPlan
        displayName: "Terraform Validate and Plan (PR)"
        steps:
          - checkout: self

          # Generate TFSTATE_KEY (same logic as your deploy pipeline)
          - script: |
              key=$(echo "${SYSTEM_TEAMPROJECT}_$(environment)_$(location).tfstate" \
                | tr '[:upper:]' '[:lower:]' | tr -d ' ')
              echo "Generated TFSTATE_KEY: $key"
              echo "##vso[task.setvariable variable=TFSTATE_KEY]$key"
            displayName: "Set dynamic TFSTATE_KEY"

          # Shared terraform setup & init
          - template: templates/terraform-setup.yml
            parameters:
              tfstateKey: $(TFSTATE_KEY)

          # Terraform Validate
          - task: AzureCLI@2
            displayName: "Terraform Validate (OIDC)"
            inputs:
              azureSubscription: "Federated-Azure-Connection-$(System.TeamProject)"
              scriptType: bash
              scriptLocation: inlineScript
              inlineScript: |
                terraform validate

          # Terraform Plan (PR tfvars)
          - task: AzureCLI@2
            displayName: "Terraform Plan (PR)"
            inputs:
              azureSubscription: "Federated-Azure-Connection-$(System.TeamProject)"
              scriptType: bash
              scriptLocation: inlineScript
              inlineScript: |
                terraform plan \
                  -var-file=environments/pr/pr.tfvars
I’ve created a new .tfvars file within the repo’s environments folder and put this in a folder called environments/pr with the filename pr.tfvars. Within this, we can pass any specific inputs we need to our Terraform plan when the pull request pipeline runs.
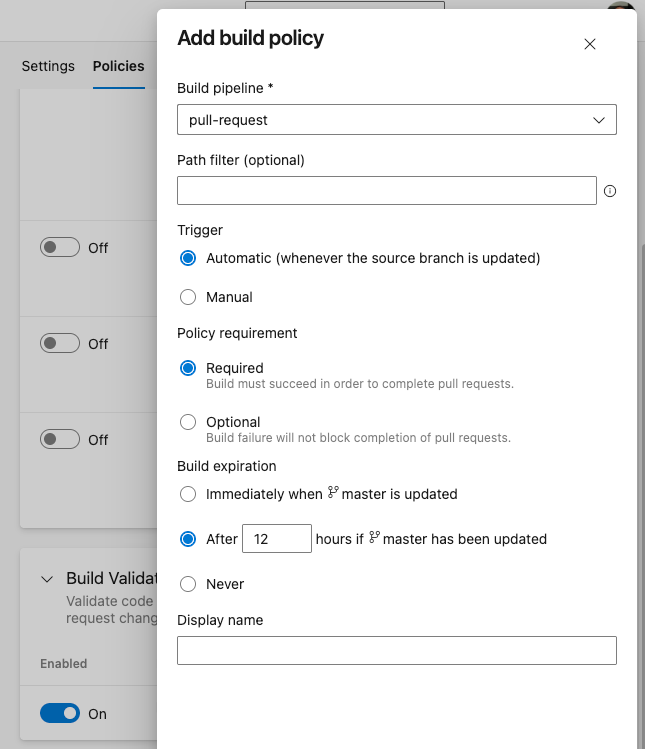
Create the pipeline within your Azure DevOps project and call it pull-request.
Set the branch policies
Branch policies allow us to protect our main branch from inadvertent changes.
Within your Azure DevOps project, select Branches and Branch Policies against the main branch.

Now turn on branch policies and require a minimum number of reviewers. Select any other options you feel are appropriate within your use case.
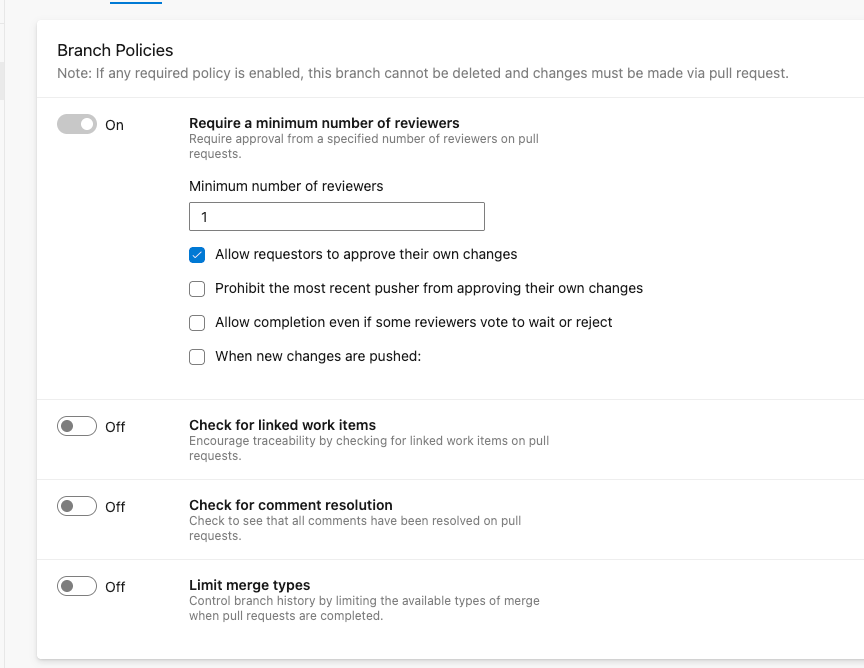
Next up, create a Build Validation Policy and select your pull-request pipeline with an automatic trigger.
Important: Remember that these policies only impact the remote repository. Any changes made locally are uncontrolled and can be done. However, if a developer attempts to commit code directly to the main branch, it will fail when they push the changes from local to the remote repository.

Create the pull request
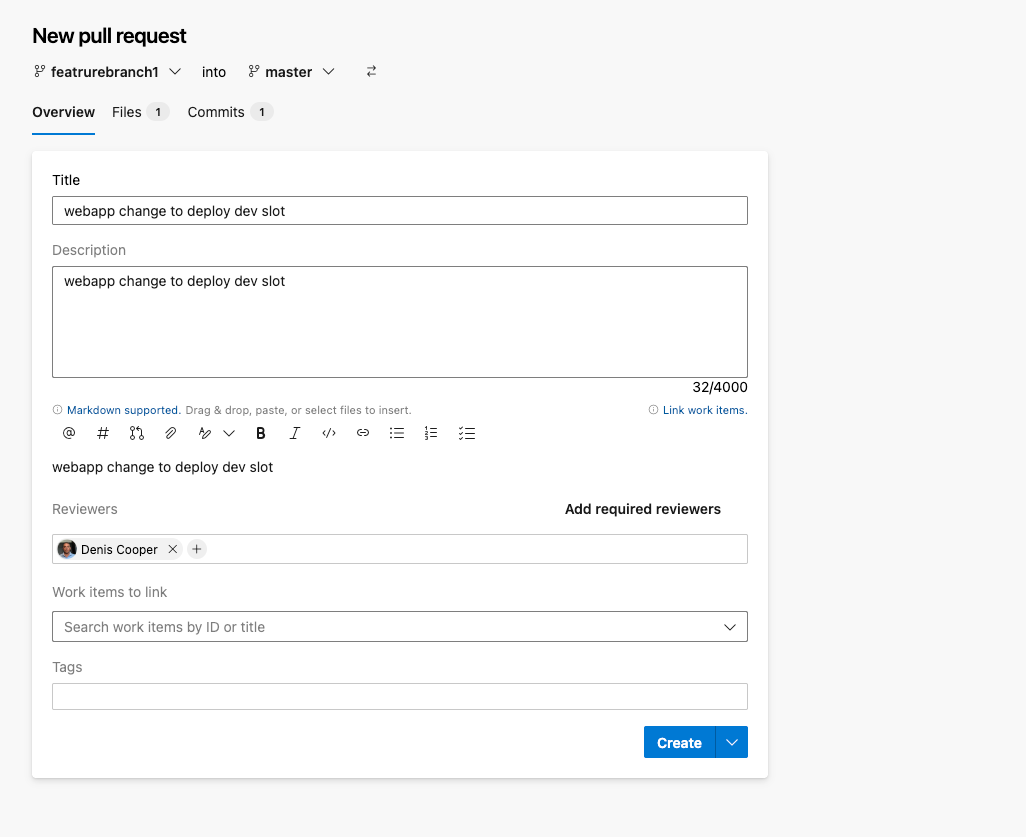
Once the developer is happy with the code in their feature branch and is ready to deploy, they can create a pull request within Azure DevOps.
Under the Repos section, select Pull Requests and New Pull Request. Select the feature branch you want to pull into main, create the title and description, and select Create.
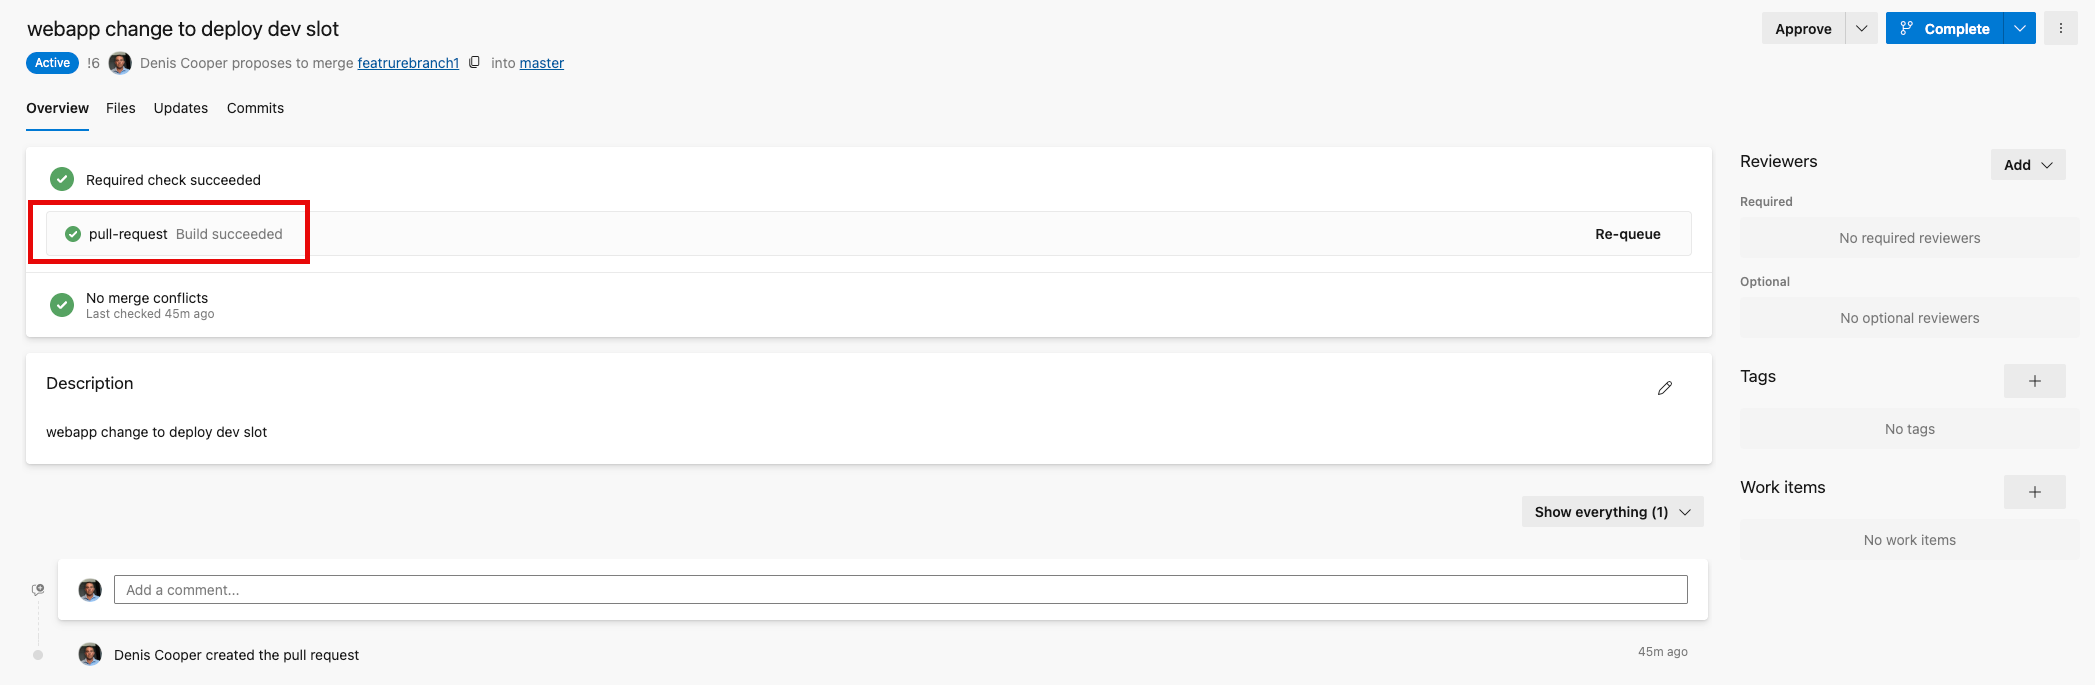
Once the pull request is created, you’ll see the pull-request pipeline is automatically triggered with a direct link to the Terraform plan being visible. Approvers can review the request, validate the plan, and approve or reject. If approved, the feature branch gets committed to the main branch.
Incorporate automatic version tagging on the main branch
We now have a working model to support working from feature branches and having a streamlined pull request that will show the impacts of merging the feature branch with main. What we need now is a way to protect existing deployments from potential breaking changes introduced in our code. This is especially handy when we have code bases shared across multiple implementations—for example, Terraform modules.
The auto-tagging pipeline
This pipeline has a trigger which is set to run when a commit is made to the main branch.
trigger:
  branches:
    include:
      - master  # or main

pr: none

pool:
  vmImage: "ubuntu-latest"

stages:
  - stage: TagMain
    displayName: "Tag Main"
    jobs:
      - job: AutoTag
        displayName: "Auto-tag main"
        steps:
          - checkout: self
            persistCredentials: true

          - script: |
              set -euo pipefail

              git config user.name "Azure Pipelines"
              git config user.email "builds@devops.com"
              git fetch --tags --force

              latest_tag=$(git tag --list 'v[0-9]*.[0-9]*.[0-9]*' \
                | sort --version-sort | tail -n1)

              if [ -z "$latest_tag" ]; then
                next_tag="v0.0.1"
              else
                IFS='.' read -r major minor patch <<< "${latest_tag#v}"
                next_tag="v${major}.${minor}.$((patch + 1))"
              fi

              if git rev-parse "$next_tag" >/dev/null 2>&1; then
                echo "Tag $next_tag already exists; nothing to do."
                exit 0
              fi

              git tag -a "$next_tag" -m "Automated tag from main merge"
              git -c http.extraheader="AUTHORIZATION: bearer $SYSTEM_ACCESSTOKEN" \
                push origin "$next_tag"
              echo "##vso[task.setvariable variable=TAG_CREATED]$next_tag"
            displayName: "Create next version tag"
            env:
              SYSTEM_ACCESSTOKEN: $(System.AccessToken)
When the pipeline runs, it first sets up some Git credentials as we need to run Git commands. It then runs a bash script to pull a list of all existing tags on the repository and increments the patch value on the tag by 1.
Create the pipeline in the main branch within the DevOps project and call it main-branch-tagging (or something meaningful to you).
Setting up credentials
We need to allow our build service access to the repo and to be able to create tags.
Within the repository settings, edit the security, select your build service, and grant it Allow to Contribute and to Create tag.

The outcome
Now when a pull request is approved, it will trigger the main-branch-tagging pipeline. The pipeline runs, checks the main branch for the latest tag, and creates a new tag linked to the latest updates from the pull request, incremented by 1.

If we need to, we can now refer to a specific version tag in our code by using the format:
source = "git::ssh://git@ssh.dev.azure.com/v3/[devops_org]/[project_name]/[repo_name]?ref=v0.0.2"Automatic security checks
A great way to add a simple checks of our code is through using an automated tool that is called during our pipeline runs.
There are several tools available for static analysis of Terraform code. In this example I’m using Checkov, as it provides a broad set of built-in policies, good Azure coverage, and integrates cleanly into CI pipelines.
Adding
          # checkov – static security analysis
          - script: |
              python3 -m pip install --upgrade pip
              pip install checkov
              checkov -d . --soft-fail
            displayName: "Run Checkov"
Before the Terraform plan commands in our pull request pipeline works well. I add the -soft-fail parameter as the tool can catch false positives which we want to know about but not necessarily stop running for. This makes the checks visible to the approvers and allows them to decide if they should allow the merge to main to continue.
Conclusion
Bringing automation and enforcing pull requests to protect our main branch helps ensure it is always deployable. It protects our code, creates automatic documentation, and provides version control. Adding the optional tagging pipeline ensures processes are followed and protects existing and future deployments from breaking changes introduced into our modules.
At this point, we’re no longer “running Terraform from a pipeline” — we’re operating an infrastructure delivery system
In next week’s post, we will work on adding in steps to detect and alert on configuration drift, catching problems early on allows us to respond and remediate quickly.